Application of Microscan Vsionscape GigE Camera in Accurate Measurement of Foxconn Camera Housing Diameter
Foxconn Technology Group is a hi-tech enterprise specializing in R&D and manufacturing of 3C products such as computers, communications, and consumer electronics, and is involved in digital content, automotive components, access, cloud computing services, and the development and application of new energy and new materials. Since Foxconn in Taiwan in 1974 and invested in mainland China in 1988, Foxconn has grown rapidly. With more than one million employees and the world's top customer base, Foxconn is the world's largest electronics industry technology manufacturing service provider.
challenge
Foxconn manufactures OEM parts for many well-known electronics manufacturers, such as Apple mobile phones, millet phones, and cameras. In the production process of the camera housing, it is necessary to detect the aperture size of the produced camera housing to prevent the entry of defective products with too large or too small apertures into the market, leading to customer complaints and affecting the company's reputation and competitiveness.
For high-volume production applications, in order to ensure the quality of production, it must consume a large amount of human resources to carry out a special quality inspection of the product, and training a qualified quality inspector takes about 3 months, which is for the flow of people. The Foxconn Group, which is unusually frequent, will be a very high investment, and when it is manually detected, the personnel will become fatigued. Due to human negligence, there will still be unqualified products entering the next production stage. Considering the dual pressures of quality and cost, a vision device is required to replace the manual measurement of the aperture of the camera housing with high precision. The measurement accuracy of this vision device is 0.01mm, which can be used for many different shapes in different time periods. The products were measured. For this reason, Foxconn engineers found us. We recommend the use of Microscan Visionscape GigE cameras for automated testing of products using a PC-Based solution.

solution
In the past, Foxconn Group has used the Microscan GigE camera to detect the aperture of the camera housing, and the customer has highly recognized the implementation effect of the equipment and solutions. This time, the customer once again purchased a set of main visual equipment with the GigE camera as its core. The secondary testing product is limited to one type of limitation. This time the solution is upgraded so that it can satisfy the measurement of many similar products. In this case, Foxconn has several kinds of camera housings. Each type of housing contains 8-12 round holes or rectangular holes of different sizes. We need to use visual solutions to measure the diameter and roundness of round holes in each product. (The ratio of the minimum radius to the maximum radius), the test accuracy is guaranteed to be within 0.01mm; after the test is completed, the measured data is saved to the txt text under the local specified path for Foxconn software developers to perform subsequent data processing. We use the Microscan Visionscpe GigE system as a visual solution
The core of the case is that it mainly has the following advantages:
Application Case - Foxconn Camera Housing Aperture Inspection
Can use standard network components to build the system
Supports up to 8 Visionscape GigE cameras
GigE Cameras Offer Multiple Configurations
Gigabit Ethernet (GigE), high-speed data transmission
Compact and lightweight, easy installation even in tight spaces
Intuitive user interface, complete system status, application monitoring and results
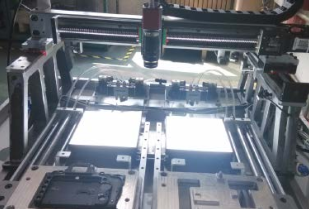
Because the accuracy of the "aperture detection" test in the solution is relatively high, we chose a 50 megapixel GigE camera from Microscan with a 50-mm fixed-focus lens. For the characteristics of the "through-hole" of the hole of the camera shell under test, the white surface light source is used, and the backlight is used. In this way, the characteristics of the object under test can be highlighted when the camera takes the picture. The entire visual equipment is installed on Foxconn's testing platform. , The camera communicates with the PLC through the industrial computer and IO board to realize the automatic detection of the product. After the camera captures the image of the object to be measured, it is processed by the powerful Visionscpe professional vision software that is matched with it. Finally, the accurate aperture data is measured and output, and then the user's secondary development application software is used to realize other uses of the data. . Real-time monitoring of the test process can also be achieved through Visionscpe vision software or secondary development software.
The system structure and test process are as follows:
The test station is divided into two left and right sides. The camera housing to be tested is placed on the corresponding type of brace. When the material is reloaded, the air cylinder carries the brace forward and backward; the camera is fixed at the central position of the screw, and the white surface light source is placed at Immediately below the position to be measured, the camera is driven by the lead screw to move forward and backward and left and right, and moves to the adjusted coordinates according to the sequence to detect multiple apertures in one product. The movement of the screw is controlled by a PLC connected to a servo motor. Under the test platform is equipped with an industrial computer with a visual digital IO card. Among them, there are 6 input and 1 output signals connected to the PLC to provide the camera with a “trigger signal†and “ready signal†for the camera. “Complete signal†is sent to the PLC. PLC controls the servo motor to drive the camera on the screw to the coordinate point of the next hole to be measured.
Conclusion and outlook
Through the use of visual solutions instead of manual measurement of the data in the production process, the investment is low and the effect is significant. Not only can the labor cost be saved, the human resources can be saved, but more importantly, the reliability and accuracy of the product inspection can be significantly improved, and the product can be significantly improved. The quality in the production process is guaranteed. Taking the electronics industry as an example, other industries that can be extended believe that with the development of visual technologies and the accumulation of practical experience in the use of visual technologies, more specific and realistic issues can be solved with machine vision.

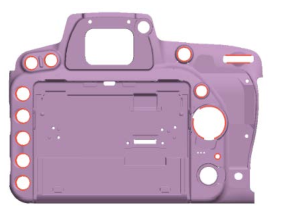
Fig. 2 Schematic diagram of camera housing aperture using Visionscape GigE detection

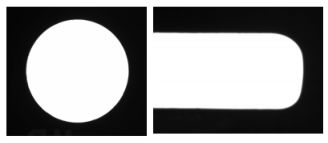
Figure 3 The effect of circular hole and square hole picture taken with Visionscape GigE

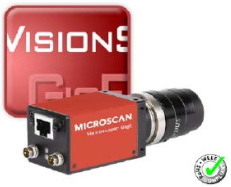
Figure 4 Microscan Visionscape GigE Cameras and Vision Software
Review

About Microscan Microscan
Microscan is a global leader in precision data acquisition, wide-range automation control solutions, and OEM applications. Founded in 1982, Microscan has a great history of technological innovation, including the invention of the first laser barcode scanner and the invention of a two-dimensional Data Matrix code. Currently, Microscan maintains its technology in the field of automatic identification and machine vision, relying on a wide range of solutions for ID tracking and the range of traceability and inspection from basic barcode reading to sophisticated machine vision inspection, identification, and measurement. leadership.
33mm Push Button,Micro Switch Push Button,33mm Arcade Game Plastic Push Button,Arcade Push Button Switch
Guangzhou Ruihong Electronic Technology CO.,Ltd , https://www.callegame.com